Disclaimer: This blog post contains affiliate links. This allows me to earn a small commission at no cost to you.

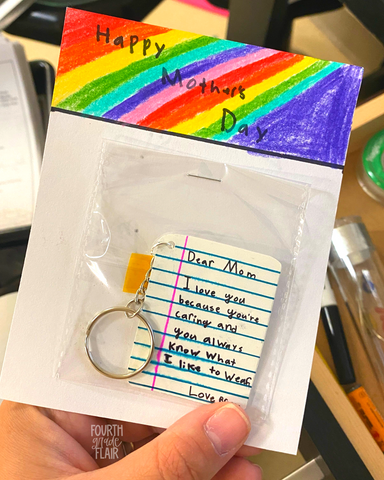
Looking for an easy craft that doesn't take up a ton of in-time class to create? Look no further! This Amazon Shoppable video tutorial will show you how to prep the shrinky dinks in order to have the students write on them. I have included some helpful tips below the video, as well as links to all of the supplies I purchased.
➡️ CLICK HERE FOR AN AMAZON SHOPPABLE TUTORIAL VIDEO WITH SUPPLIES INCLUDED! ⬅️
What You Need:
- frosted Shrinky Dink paper
- key chains
- Sharpies - pink, blue, and black
Want easy access to all materials at once? Click here for the link.
Helpful Tips ⬇️
👉 Make sure to hole punch BEFORE you bake. This cannot be done after they bake as they will be super hard!
‼️ Hole punch fairly close to the edge, but not too close. Too far away means the jump ring won't reach to attach the key chain. Too close means the hole's edges will be frail and more likely to break.
✍️ Draw on all of the lines before you cut. This speeds up the process if you are doing the prep work at home. I highly recommend doing the lines yourself and just leaving the Sharpie message to the kids. I recommend buying a big pack of black Sharpies so kids are rushing each other to finish! Plus, black Sharpies always come in handy in the classroom later.
✂️ Round the corners for safety. If you forget to cut the edges like I did at first, the key chains can become dangerously sharp! Round the corners before you bake with scissors.
📏 Mark carefully to ensure even size. In order to keep them the same size, I marked a dot at 4 inches across the width and then at 5 inches. At 5 inches is where I made my second vertical pink line. At four inches is where I flipped over to the frosted side and made my cut mark using a pencil.
📝 Have the kids do a rough draft first! Speaking of the Sharpie message, have the kids write out their message first on a cut up index card that mimics the same size as the shrinky dink before it bakes. This helps them plan how big their words need to be. I always checked for spelling and capitalization before giving them their final one to write on. We also brainstormed together as a class some short phrases we could add to them.
🎛️ Bake only a few at a time. If they get too close in the oven while they are shrinking, they can jump and stick to each other, and that's not good!
⚠️They WILL look like they are ruined as they bake! They will crinkle up and stay that way for what seems like forever. Give it a minute and leave the oven closed. They will flatten out. I always have a plastic spatula ready as soon as they come out of the oven to completely flatten them while they are still hot.
👀 Watch the second and subsequent batches as they go into the oven. Each batch seems to go quicker and quicker!
🗝️ Mod-podge to seal them after baking so the words don't rub off. We all know how tough moms are on keys! A quick coat of mod-podge will keep these keychains lasting longer.
🎀 Add a special touch with a gift pouch. The little organza bags aren't necessary, but they are an adorable touch for the kids to gift them with. My kids felt so grown up that they had a gift made and packaged to deliver to the special women in their lives!
❤️ Add some flair and personalization with a tassel or charm! If you want to add something special, you could order some cute key chain tassels and let the students pick their mom's favorite color! For a low cost option, use index cards like in the first photo and have the kids make personalized backers!

